
Vevor Air Jack Overview
Just posted a new video where I take a look at the Vevor air jack from amazon. Check it out below!
Milton Couplers
It’s easier for me to just post my Instagram post here and if you haven’t followed me over there feel free to. The short of it is I got my replacement Milton Couplers!
It’s tire season again!
Well it’s that time of year again for many people. I actually changed mine 2 weeks ago as of this post and I probably really should have left it until about now due to the cold weather this year. So for those of you still having to do your tire change over especially this coming weekend I want to list a few tips for you.
I would also like to note this is mainly going to be aimed at those who have tires and rims for both their winter and summer since many people are unlikely to have a tire machine and balancer at home.
1: Clean your rims before you put them on your car.
While it may seem like a lot more work it’s actually easier to properly clean your rims before putting them on your vehicle. It’s also a good idea to put a coating of wax or a hybrid ceramic coating on your rims to help keep dirt and brake dust off them for longer.
2: Check your tread depths on both sets of tires.
Now reason I’m saying to check this on both sets of tires has a few advantages. Checking the tread depth on the tires that are coming off will allow you to check for uneven wear and cracking in the tread. If the set that is coming off have worn unevenly it would be a good idea to track down the issue before it happens to the summer set. Also you can see if the tread is getting low to the point where you may want to start saving for a new set next season. Now checking the tread depth of the set going onto the vehicle will allow you to position them for optimal tread wear.
3: As with the tread depth you should also check your tire pressures for both sets of tires.
Now there is a lot of controversy over this but I’m a firm believer in storing my tires at the OEM specification of vehicle they came off of. Reason being is that when you check your pressures the following season you can tell if one of the tires has developed a leak as it will be quite a bit lower than the others.
4: Always use jack stands even if you’re not working under the vehicle.
Some people like to shortcut it and just jack up the car undo the wheel and put the summer wheel on thinking there is no harm in not using a jack stand since they aren’t working under the car. Well, if you think about it if the jack were to suddenly drop when you were trying to position your wheel onto the hub you can basically say goodbye to your fender. Not to mention you have no clue where you fingers could be at that time. So remember it takes only a few seconds to position a jack stand under the car which can save you a lot of headaches.
5: Check the condition of your brakes while the wheels are off.
It’s always good to do a quick visual inspection of your brakes when you have the wheels off.
Check the rotors for scoring or pitting from excessive rust. Also check the inner and outer brake pad thickness, they should be close to even, a brake pad measuring tool is excellent for this. As for drums I would suggest to most people to leave them alone. If you try pulling them off and rust catches on the shoes you can certainly pull thins off of where they are supposed to go.
6: Clean your hub surfaces.
Don’t forget to clean your hub surfaces. Dirty hub surfaces I would personally say is one of the main contributors to “wheel offs”. Make sure there is no excessive rust or corrosion on the hub or rim mating surfaces.
7: Torque and retorque.
Don’t forget to torque your wheel to their recommended specifications for your vehicle. Also don’t forget to retorque your wheels after 50-100km as the stresses of driving can affect the torque of the wheels.
I think that’s it! Did I miss any tips or tricks that you would suggest? If I did message me on Instagram or via my contact form.
Rearranging pages
Glad I got most of the content of the site fixed. However, since this site is going to be more blog style I will be reordering how the pages are laid out. Currently I think all of them are in oldest to newest format which is not the best for blog style websites which is what this is. So I will be rearranging all the pages to follow the newest to oldest format with links to the bottom of the pages so you can follow the whole journey if you wish. If you have any suggestions hit me up via the contact page or my social media.
Media Transition Complete
So I have finally finished the media transition, some older articles may have media missing but the main pages are all done. Originally I had planned to strictly use Google drive only but it couldn’t keep up with the number of images I have on the site. After much trial and error I have decided to incorporate a hybrid of the two options available which unfortunately requires a little more work on my part. So through the CDN I will be hosting low quality media with it being linked to higher quality media stored via Google drive. I believe this delivers both speed on the site and the ability to still have access to high quality media. If there are any issues you happen to find you can let me know via my new contact page.
Media Transition
So for the next few days I will be transitioning all the media on the site to google drive and youtube. This is mainly due to there being a hard cap limit on wordpress of 200gb on the top tier plans. While yes that sounds like a lot it actually isn’t once you start factoring in videos and high resolution photos. With the transition I will have to manually move all the media on the site. With google drive while it will cost me money past a certain storage amount at least I have the option to expand up to 2TB going forward.
Well Then…
So I’ve been pretty quiet on my site here and well I’ve been pretty busy in my daily life. From moving back home to trying to find a job I actually like and can settle into and all sorts of stuff mixed in between, I am hopefully going to actually work on this site regularly. I have actually been stockpiling many pictures and videos of what I have been doing but haven’t been posting them to the site or social media.
At the end of 2020 I had decided to change NotSoEpicMods to something more, I guess professional sounding and I spent much of my holiday time off coming up with a new name. I am finally at the point where I am transitioning the site to the new name. Moving forward I will posting and updating everything under JT Reworks. The site will now be under the primary domain of jtreworks.ca as well. Now I will still be retaining the NotSoEpicMods moniker as I will still have some old content that references it and the domain notsoepicmods.com will redirect to the new domain. I feel this new name sounds more mature and professional while still retaining relevance of what I like to do which is to create, modify and fix things.
During this transition the website may look a little broken and unfinished in some places. All the pages should work fine using the navigation menu but some internal links may not work as intended. I’m hoping I dedicate more time to updating the website going forward. Thank you for reading.
Why wheel torque is important.


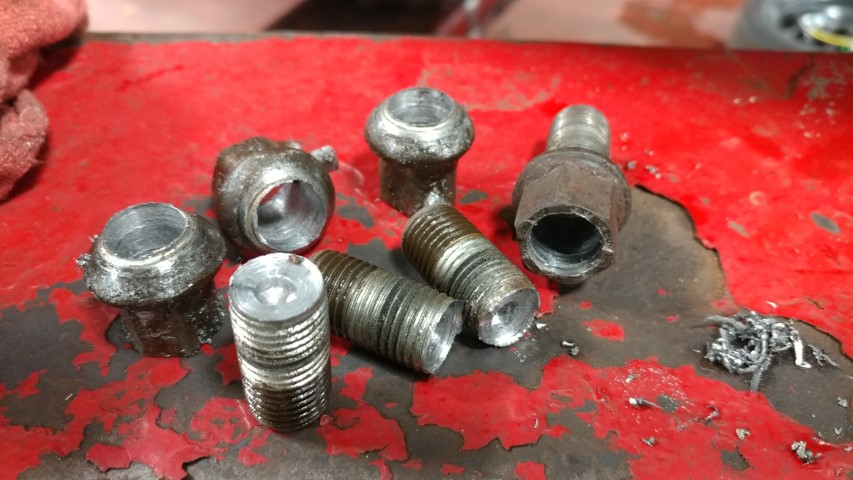
Pictured above: Wheel that was over torqued and required 2 hours of drilling to remove the wheel without damaging it.
It’s been that time of year for a few weeks now, and if you live in a colder climate you know what I’m talking about, winter tire season. Yes, the time of year many people dread, long wait times and for some the unfortunate news of a problem hindering the installation of their tires. One of the many reasons that could cause this is improper wheel torque, so it’s good to educate yourself. It’s sad to say but as someone who has worked in the automotive service industry for just over a decade it’s surprising how many little shortcuts some technicians/installers use. One shortcut many do is not properly torquing wheels onto vehicles and usually causing an over torque situation once the wheels need to be removed again. The worst of this I’ve witnessed personally many times where technicians claim they can “feel” the torque while using the impact gun. No matter what anyone claims to say and how much experience they may have there’s not way to “feel” the torque of an impact gun.
The next is not using torque sticks properly or not using the proper one. Somewhere along the line of automotive service history someone came of with the brilliant idea of using torque limiting sticks which are essentially a set of calibrated extensions put between the impact gun and the socket. These are somewhat the middle ground of doing it properly and doing it fast but they can be wildly inaccurate if not used properly. Torque sticks come in a variety of settings but come most commonly as ft/lbs in 60, 80, 90, 100, and 120. What many technicians don’t know is that torque sticks only limit a certain input range. For example, a 100 ft/lbs torque stick will limit an input of 200-350ft/lbs down to its rated 100ft/lbs. The problem lies in when you start to input more than 350ft/lbs which many of today’s impact guns are are easily capable of doubling. With the higher input torque the output will now also be higher but still reduced.
The proper way to tighten wheels is the use of a calibrated torque wrench and following the manufacturer’s procedures. This is the most accurate way to tighten wheel onto a vehicle but also takes the longest time to do. So now you know, obviously you’ll want to find a shop that follows the proper procedures but if you’re unsure of the place you’re getting tires put on ask them if they at least use torque sticks. Also, don’t forget to return for a wheel retorque, many shops offer it as a courtesy.

